How to Accept Credit Card Payments in Laravel 12 Using Square
If you want to accept credit card payments on your Laravel 12 website, Square is a great option. It’s fast, secure, and works well with Laravel. In this guide, you’ll learn how to add Square payment to your Laravel app step-by-step — from setup to payment success. This is perfect for developers building e-commerce sites, SaaS platforms, or any website that needs online payments.
Prerequisites
Before we start:
- Laravel 12 installed
- A Square Developer account
- Square application ID, access token, and location ID
Step 1: Set Up Square Configuration
Add your Square API credentials in .env:
SQUARE_ACCESS_TOKEN="EAAAl_J***********************************MyiZ8baIl"
SQUARE_LOCATION_ID="L************4"
SQUARE_ENVIRONMENT=sandbox # or 'production'
SQUARE_APPLICATION_ID="sandbox-****34-59gJ*******K90"
Then in config/services.php, add:
    'square' => [
        'access_token' => env('SQUARE_ACCESS_TOKEN'),
        'location_id' => env('SQUARE_LOCATION_ID'),
        'environment' => env('SQUARE_ENVIRONMENT', 'sandbox'),
        'application_id' => env('SQUARE_APPLICATION_ID'),
    ],
Step 2: Install Square SDK
Install the Square PHP SDK via Composer:
composer require square/square
Step 3: Payment Controller Logic
Create a PaymentController to handle display and charging logic.
php artisan make:controller PaymentController
Here’s the implementation:
<?php

namespace App\Http\Controllers;

use App\Models\Payment;
use App\Notifications\PaymentSuccess;
use Exception;
use Illuminate\Http\Request;
use Illuminate\Support\Facades\Notification;
use Illuminate\Support\Str;
use Square\SquareClient;
use Square\Environments;
use Square\Payments\Requests\CreatePaymentRequest;
use Square\Types\Money;
use Square\Types\Currency;


class PaymentController extends Controller
{
    public function show()
    {
        // Static plan for demo
        $plan = ['name' => 'Basic Plan', 'price' => 500]; // 5.00 USD
        return view('payment.form', compact('plan'));
    }
    public function charge(Request $request)
    {
        $request->validate([
            'nonce' => 'required|string',
            'amount' => 'required|numeric',
        ]);

        $nonce = $request->input('nonce');
        $amount = (int) $request->input('amount') * 100; // Converting Cents to Dollar

        $client = new SquareClient(
            token: config('services.square.access_token'),
            options: [
                'baseUrl' =>  Environments::Production->value,
            ],
        );

        $response = $client->payments->create(
            new CreatePaymentRequest([
                'idempotencyKey' => Str::uuid()->toString(),
                'amountMoney' => new Money([
                    'amount' => $amount,
                    'currency' => Currency::Usd->value,
                ]),
                'sourceId' => $nonce,
                'autocomplete' => true,
                'locationId' =>  config('services.square.location_id'),
                'note' => 'New Payment for Plan Basic Plan',
                'customerId' => '1' . '_' . Str::uuid()->toString(),
            ]),
        );
        try {
            $payment = $response->getPayment();

            if ($payment && $payment->getStatus() === 'COMPLETED') {

              // OPTIONAL : Storing in Database

                Payment::create([
                    'transaction_id' => $payment->getId(),
                    'status' => $payment->getStatus(),
                    'amount' => $payment->getAmountMoney()->getAmount(), // Store amount in cents
                    'currency' => $payment->getAmountMoney()->getCurrency(),
                    'card_brand' => optional(optional($payment->getCardDetails())->getCard())->getCardBrand(),
                    'last_4' => optional(optional($payment->getCardDetails())->getCard())->getLast4(),
                    'receipt_url' => $payment->getReceiptUrl(),
                    'raw_response' => json_encode($payment),
                ]);

                return redirect()->route('payment.success')->with('success', 'Payment successful!');
            } else {
                return back()->withErrors(['error' => $response->getErrors()[0]->getDetail()]);
            }
        } catch (Exception $e) {
            return back()->withErrors(['error' => $e->getMessage()]);
        }
    }
    public function success()
    {
        return view('website.payment-success');
    }
    public function cancel()
    {
        return view('website.payment-cancel');
    }
}
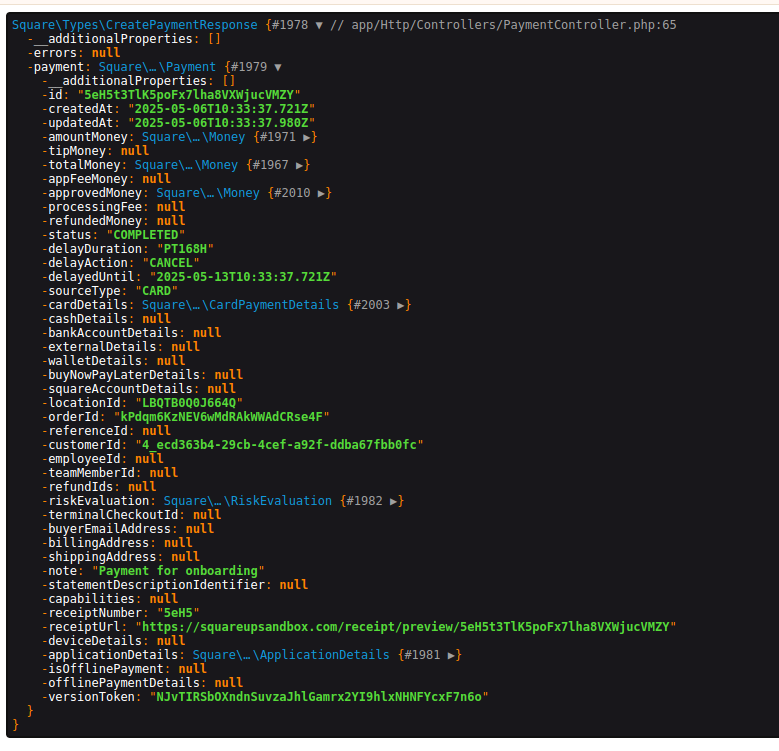
If you use dd() instead of saving it in Databse then you will see response someting like this
🔒 Important Note
Square payments require HTTPS
Square’s Web Payments SDK only works on secure (HTTPS) connections. You cannot test or load the card input form on HTTP or non-secure environments.Even on
localhost, the card UI may not appear and may throw errors in the browser console if not properly set up or if usinghttp://.To test payments properly (including card fields), you must deploy your Laravel app to a live server with HTTPS enabled.
You can use free tools like Let's Encrypt or Cloudflare SSL to enable HTTPS on your domain. For quick deployment, consider platforms like Render, Vercel, or a VPS with SSL (e.g., Hostinger + CyberPanel).
Step 4: Create the Payment Blade View
@extends('layouts.app')

@section('content')
<script src="https://{{ config('services.square.environment') === 'production' ? 'web' : 'sandbox.web' }}.squarecdn.com/v1/square.js"></script>

<div class="max-w-lg mx-auto mt-10">
    <h2 class="text-2xl font-bold mb-4">Pay for {{ $plan['name'] }}</h2>

    @if ($errors->any())
        <div class="bg-red-100 p-4 rounded mb-4">
            @foreach ($errors->all() as $error)
                <p class="text-red-800">{{ $error }}</p>
            @endforeach
        </div>
    @endif

    <p class="mb-2">Total: <strong>${{ number_format($plan['price'] / 100, 2) }}</strong></p>

    <div id="card-container" class="mb-4"></div>
    <button id="card-button" class="btn btn-primary">Pay ${{ number_format($plan['price'] / 100, 2) }}</button>

    <form id="payment-form" method="POST" action="{{ route('payment.charge') }}" style="display: none;">
        @csrf
        <input type="hidden" name="nonce" id="card-nonce">
        <input type="hidden" name="amount" value="{{ $plan['price'] }}">
    </form>
</div>

<script>
    document.addEventListener("DOMContentLoaded", async () => {
        const payments = Square.payments(
            "{{ config('services.square.application_id') }}",
            "{{ config('services.square.location_id') }}"
        );
        const card = await payments.card();
        await card.attach("#card-container");

        document.getElementById("card-button").addEventListener("click", async (event) => {
            event.preventDefault();
            const result = await card.tokenize();

            if (result.status === "OK") {
                document.getElementById("card-nonce").value = result.token;
                document.getElementById("payment-form").submit();
            } else {
                alert("Payment Error: " + (result.errors?.[0]?.message || "Unknown error"));
            }
        });
    });
</script>
@endsection
Step 5: Add Routes
Update routes/web.php:
use App\Http\Controllers\PaymentController;

Route::get('/payment', [PaymentController::class, 'show'])->name('payment.show');
Route::post('/payment/charge', [PaymentController::class, 'charge'])->name('payment.charge');
Route::get('/payment-success', [PaymentController::class, 'success'])->name('payment.success');
Route::get('/payment-cancel', [PaymentController::class, 'cancel'])->name('payment.cancel');